Hands-on: Start a Nextflow nf-core workflow on your computer
- 30 min
- Intermediate
This tutorial will show you how to run an example Nextflow workflow from nf-core, on your own computer. You might want to go through this short tutorial first before starting the related tutorial to register such workflow run with the LabID command line interface (CLI).
All workflows from nf-core come with example datasets, such that you can easily test their execution. Here we will use the demo workflow from nf-core, which is fairly quick to complete.
Prerequisites
To run this tutorial, you need to install a few things on your computer.
-
Nextflow
Follow the official installation instructions.
If you are installing with conda, and already have installed the LabID CLI, you can use the same environment, or create a separate one (but you will have to switch between both for this tuto).
Make sure your installation works with
nextflow info -
Docker
When a nf-core workflow is executed, all dependencies are downloaded automatically, using specific versions to ensure reproducibility.
Nextflow can use several solutions to pull the dependencies, but recommend using docker.
To install docker for your system, see get docker.
Note : Nextflow can also use conda to resolve the enviromnent, this is however not recommend according to the nf-core guidelines.
Step 1 : Download the input data
Before starting the workflow, you can download the input datasets, together with a samplesheet and config file here.
Move the zip to a place like your Documents and unzip it. The resulting nfcore_demo_run will be our workflow run directory. It should look like the following:
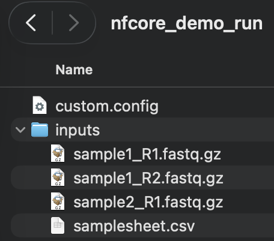
You can inspect the samplesheet.csv in the directory inputs.
It lists 2 samples : Sample1 being a paired-end (PE, and so referencing 2 files) and Sample2 a single-end (SE).
Step 2 (optional): Edit the maximum resources in the config
The config file custom.config set the default limits the various processes called by the workflow can use :
- CPU cores : 6
- RAM : 12 Gb
You can try running the workflow with these default values. If the workflow fails with an error message like Process requirement exceeds available memory, then try to decrease those values by editing the resourcelimites in the custom.config file.
Step 3 : Start the nf-core demo workflow
To start the workflow, open a terminal in the nfcore_demo_run directory and paste the following command.
nextflow run nf-core/demo -r 1.1.0 -profile docker --input inputs/samplesheet.csv --outdir . -c custom.config
We pass docker to profile to specify that Nextflow should get the dependencies using docker.
You can also try passing conda instead of docker if you dont have docker installed.
This may take a minute or two to execute.
If the workflow completed successfully, the terminal should show a message like :
-[nf-core/demo] Pipeline completed successfully -
Error docker: Got permission denied while trying to connect to the Docker daemon socket
If you get this error, try opening docker desktop before calling the nextflow run command
Other errors ? Try updating nextflow
If you already have Nextflow installed, and you get an error like ERROR ~ Plugin nf-schema with version @2.6.1 does not exist in the repository, try updating Nextflow with nextflow self-update.
What is the difference between the working and output directory
By passing . to the outdir argument, we set the current working directory (the one from which the command is started) to also be used as output directory. If you pass an output directory different from the working directory, you would get the data "published" by the workflow in this output directory, while the intermediate files (the work directory and some of the logs) would be created in the working directory.
nf-core workflow also come with default test datasets
Here we are passing a custom samplesheet, referencing local datasets. All nf-core workflows can also be run with the test profile (like -profile docker, test) which uses a default sample sheet and input datasets from the cloud. You can then omit the --input argument.
Step 4 : Inspect the workflow run directory
If you open a file browser in the run directory you should now see the following :
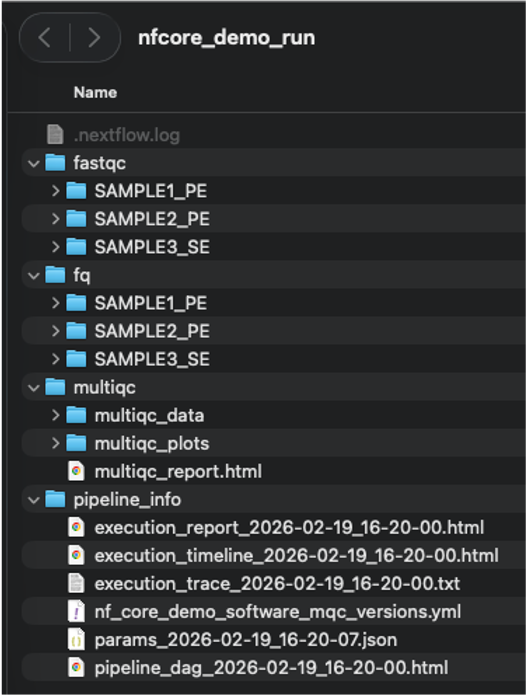
The subdirectories fastqc and fq contains the output data for the 2 samples the workflow processed : Sample1 being a single-end (SE) and Sample2 a paired-end (PE).
The multiqc directory contains the multiqc_report.html that you can double-click to visualize in a browser. This directory is common for nf-core workflows, which typically include multiqc as part of the workflow.
The pipeline_info is generated by Nextflow and contains information about the workflow execution (time, resources...). The directory also contains a visual diagram of the steps of the workflow executed (the pipeline_dag file).
Again just double-click to open any of these html files in your browser.
The content of this directory might change slightly based on your Nextflow configuration, which can be adjusted to deactivate the creation of such files (see Nextflow reports).
The different outputs are explained in details on the nf-core workflow page.
Step 5 (optional) : Generate a Workflow Run RO-Crate for the run using the nf-prov plugin
Nextflow supports generating Workflow Run RO-Crate, which are self-contained and interoperable way to share the result of a workflow execution. LabID can take advantage of such RO-Crate to automate the registration of such workflow runs.
To generate a Workflow Run RO-Crate, first enable provenance in the custom.config.
- Open the file in a text editor
- Set
enabled = truein theprovblock, as below:
Then re-run the same workflow command with -resume so Nextflow reuses cached results and only performs the additional provenance-related steps:
nextflow run nf-core/demo -r 1.1.0 -profile docker --input inputs/samplesheet.csv --outdir . -c custom.config -resume
If you look at the run directory, you should now see a few additional files.
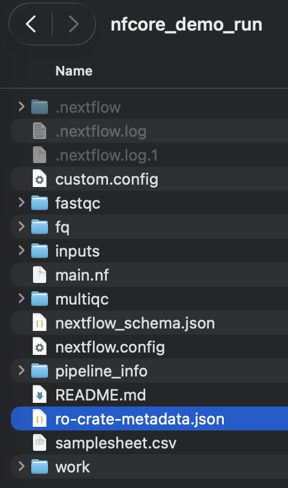
-
ro-crate-metadata.json This is the main json file required by the RO-Crate specification. It lists all the file involved the workflow run (input, outputs), workflow parameters and key files composing the workflow (such as the
main.nf) -
README.md
This is the README from the nf-core/demo github repository -
main.nf
This is the main workflow file or "entry point" for the workflow. -
nextflow.config
The default configuration used besides the custom.config. -
nextflow-schema.json
These files were copied by the nf-prov plugin, to ensure the run directory is "self-contained" and thus compliant with the Workflow Run RO-Crate specification.
With nf-prof plugin, outdir must be the working dir !
When using the nf-prov plugin, the command will fail (or raise a warning) if the argument --outdir is different from the current working directory. This is most likely to ensure that all files required to document the workflow run are in the output directory (a RO-Crate must be self-contained i.e contain all the files and folders described in the main json file).