Hands-on: Register a workflow run with the CLI - nf-core example
- 50 min
- Advanced
This tutorial shows how to register a nf-core workflow (nf-core/demo 1.1.0) using the LabID command line interface (CLI).
We recommend first executing the workflow, which is described in this tutorial, alternatively you can download here a zip of the workflow run including input and outputs of the run (some of the files in this zip are placeholder files though, not the original data to keep the zip lightweight).
The registration command will create a new Workflow Run on the server, register new Datasets for some of the files and folders used and produced by the workflow and associate them to the Workflow Run.
Prerequisites
To run this tutorial, you need to install and configure the LabID Command Line Interface (CLI).
The installation and configuration is described in this getting started tutorial.
If you are based at the EMBL, you don't need to install the CLI, you can instead use the central installation from the g drive (see CLI).
Wether you executed the workflow or downloaded the zip of the workflow run, before starting this tutorial make sure you have a run directory looking like the following :

Step 1 : Import the demo workflow in LabID
Before registering this Workflow Run in LabID, we first need to create a Workflow Version by importing the nf-core demo workflow in LabID . We will import the workflow from its github repository https://github.com/nf-core/demo/tree/1.1.0.
Follow the instructions here using the URL above and making sure to select version 1.1.0 in the workflow version commit dropdown (selected by default if this is the latest release version).
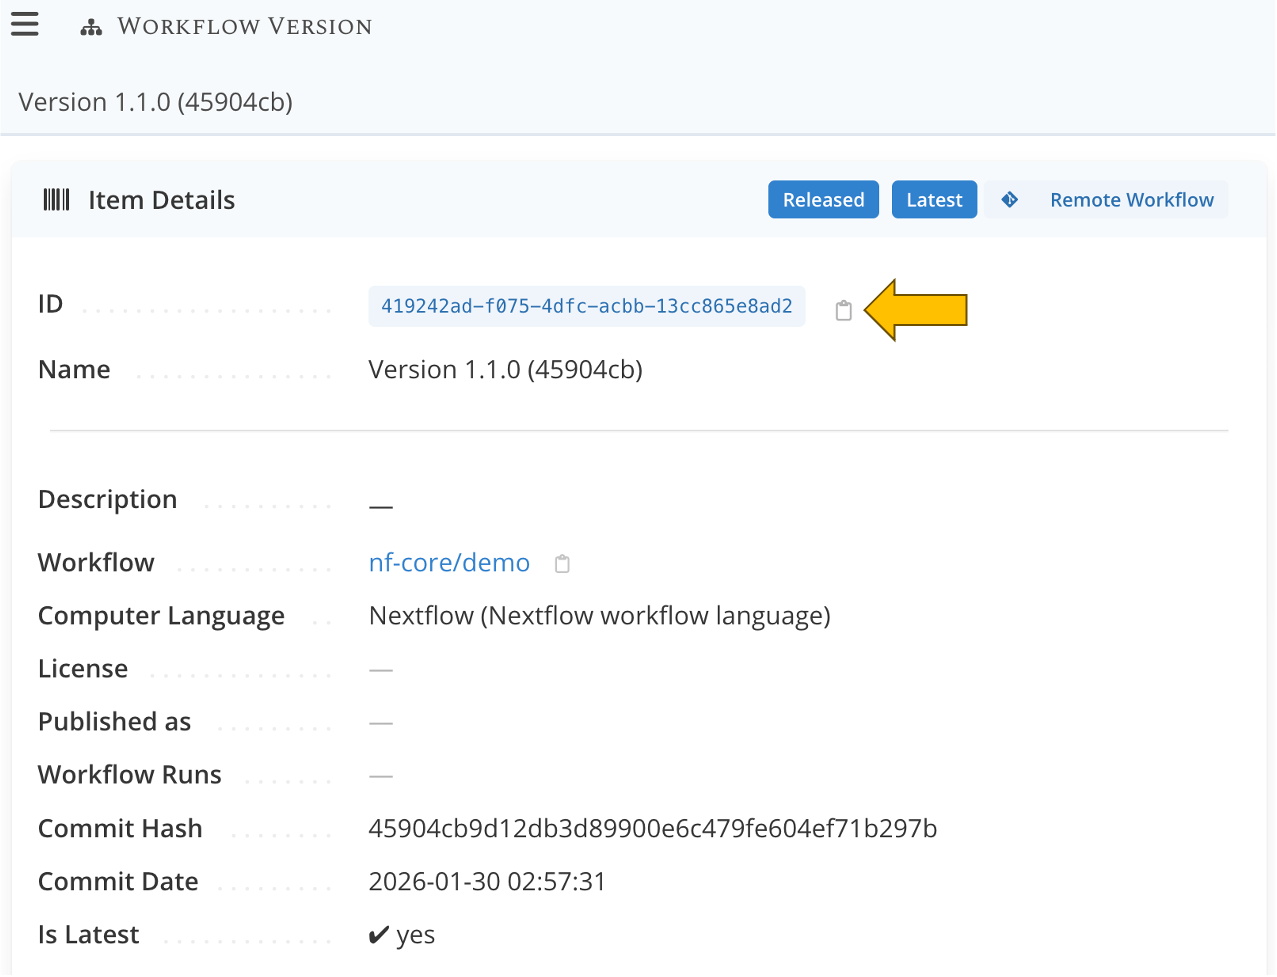
After importing the workflow, you will be taken to the page of the newly created Workflow Version.
On this page,
- copy the ID by clicking on
- paste the value somewhere so you can use it later, like in a text editor
Step 2 : Get the study ID
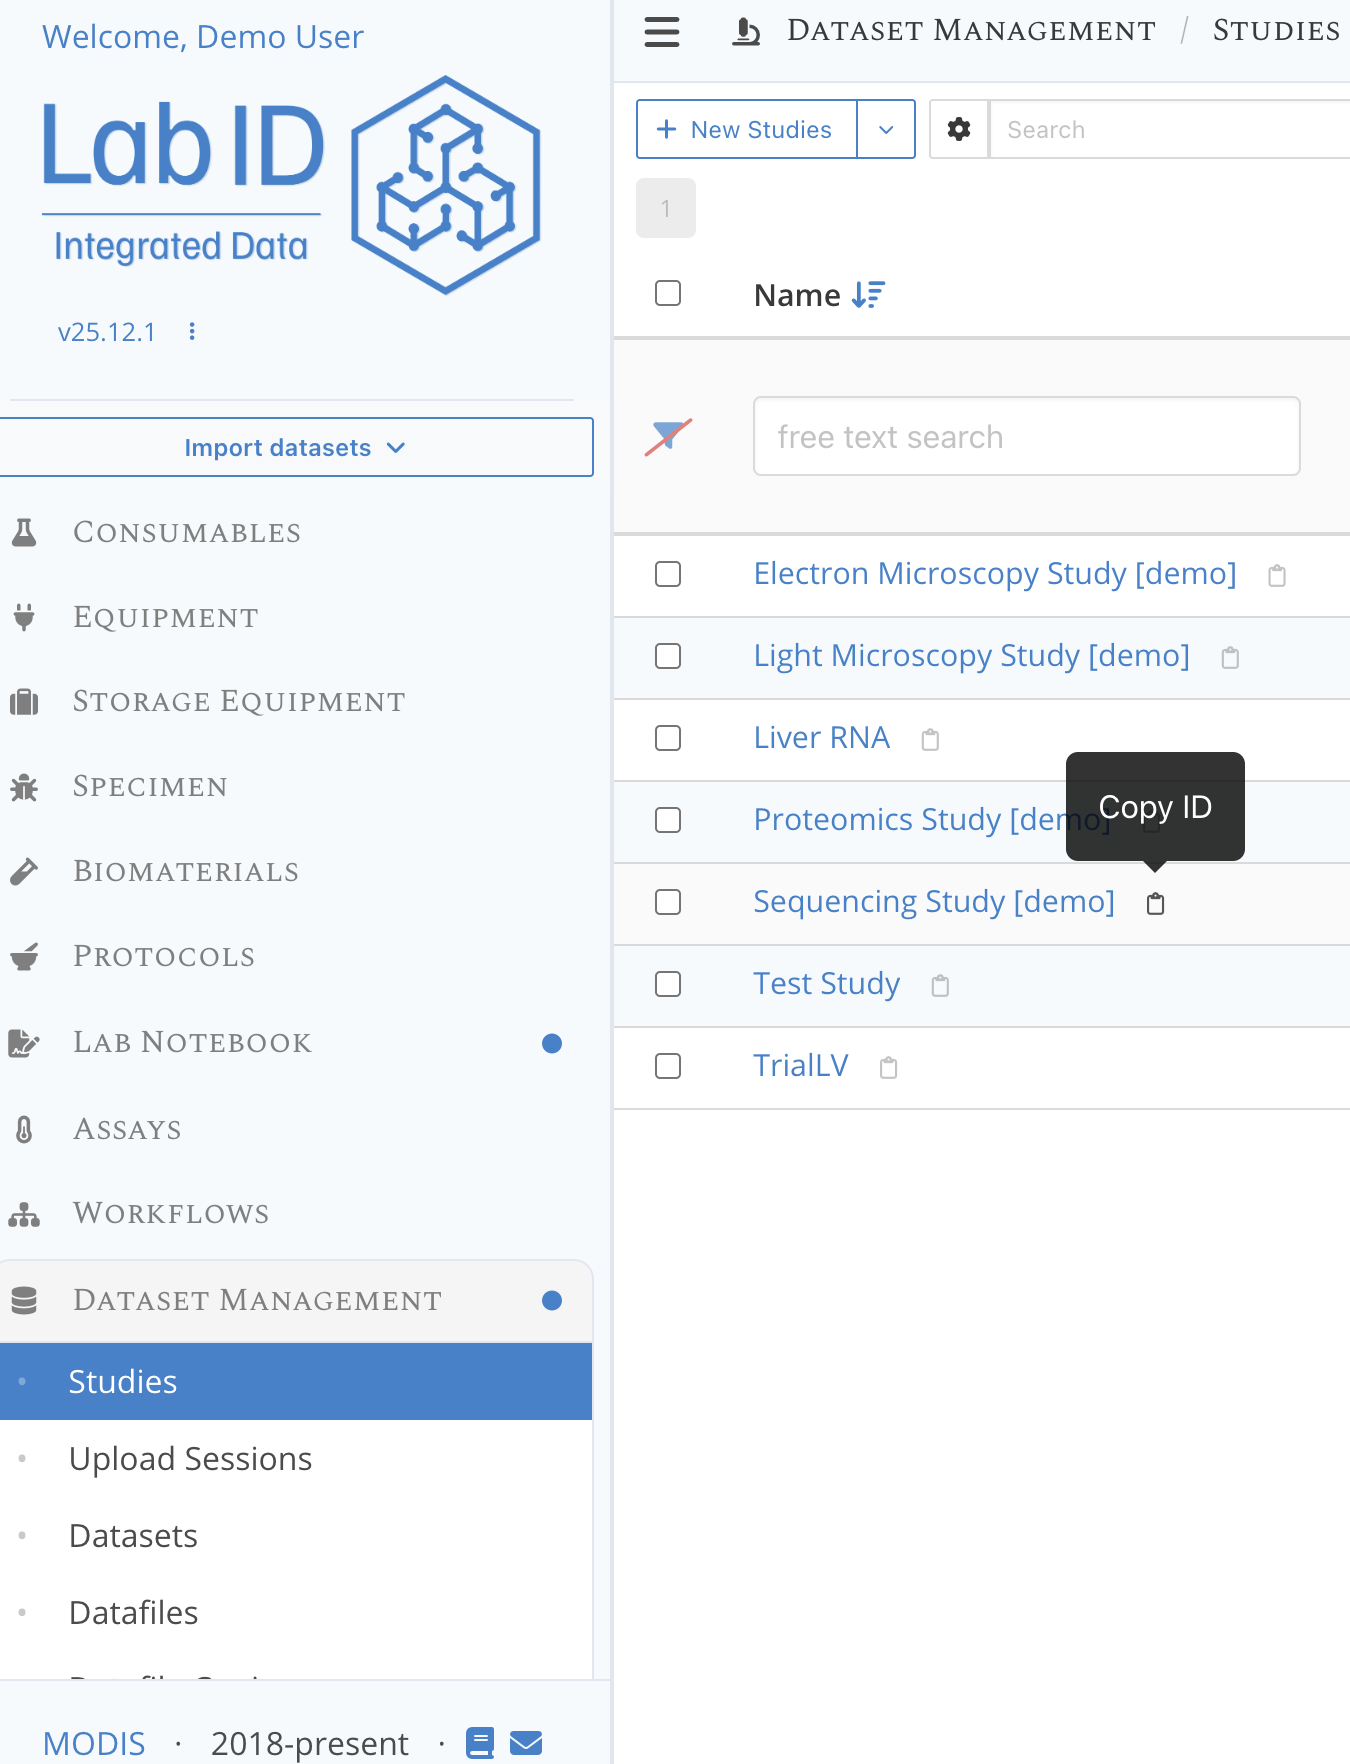
Besides the ID of the Workflow Version, we also need the ID of a LabID Study in which the datasets for the workflow run will be registered.
We can use one of the predefined study available on the demo server, such as the Sequencing Study [demo].
- go to the section Dataset management on the left of the LabID interface, then click on Studies.
- from the list of studies, click the next to the name of the study to copy its ID, again paste this ID somewhere so you can use it later.
Step 3 : Check the CLI configuration
Before registering the workflow run, let's make sure the connection to the server works fine, and let's refresh the authentication token.
-
Open a terminal
-
Let's first check the server URL and user currently configured for the CLI
labid config show
-
the demo server should be configured, with one of the demo user (e.g
trainee1) -
Now refresh the authentication token with
labid config refresh -
Enter the LabID password for the user reported by the
labid config showcommand, and press enter.
Note : nothing will be shown as you type your password in the terminal
The register wfrun command and Workflow run sniffers
To register the workflow run with the data using the LabID command line tool, we are going to use the command labid register wfrun in a terminal.
If you execute labid register wfrun --help you are going to see all parameters supported by this command.
The different parameters are documented as part of the Registering workflow runs with the CLI. Here is a short description of the parameters we will use.
Samplesheet
This workflow uses a samplesheet to define its input (in inputs/samplesheet.csv).
The register wfrun command can directly parse this samplesheet to extract the paths to the input data.
We just need to pass --samplesheet inputs/samplesheet.csv to the command, and specify the column containing the paths to the file (fastq_1, fastq_2) and the one containing the sample identifier (sample), htat is used to name the datasets.
Search strategies for other dataset types
For the other dataset types (Output, Log, Report, Config), we will use the option --search-strategy-table.
The table to pass to this flag is provided in the example run directory (here) : the file search_strategies.csv.
Below is the content, that you can also copy/paste into a text editor and save as a csv.
CATEGORY,PATTERN,PATTERN_TYPE,TARGET,RECURSIVE,EXCLUDE_HIDDEN,DIRECTORY,COLLECTION,REGEX_ON_FILENAME_ONLY
OUTPUT,*.fastq.gz,GLOB,FILES,TRUE,TRUE,fq,,
LOG,*.log,GLOB,FILES,TRUE,FALSE,,,
REPORT,*.html,GLOB,FILES,TRUE,TRUE,,,
CONFIG,*.config,GLOB,FILES,FALSE,TRUE,,,
This table defines what files to register for each type (except the INPUT type, already covered by the samplesheet).
In short, this table defines the following search strategies :
- For outputs,
filesending with*fastq.gz, and located in subdirectories of thefqdirectory of the workflow run will be registered - For the logs, any file ending with .log (pattern
*.log), anywhere in the run directory and subdirectories will be registered - Similarly for reports and config we will use the search pattern
*.htmland*.config.
Parent/children association between datasets
If you look at the run directory layout, you can see that some outputs are directly derived for a specific input (i.e sample 1 or sample2).
We can also configure the register wfrun command to establish these parent/children relations, using the name of the dataset : output datasets for a given sample just have a suffix compared to the sample identifier/dataset name of the inputs.
Establishing parent/child relations between datasets this way translates to the option --parent-children-matching DATASET_NAME.
One could also specify --parent-children-matching-plurality ONE_TO_MANY but this is the default value so we can omit it.
Step 4 : Execute the register wfrun command
Now that we have both the ID for the Workflow Version and the Study, and covered the syntax for the command, we can try executing the command to register the workflow run.
- open a terminal and set the working directory to the nextflow run directory
nfcore_demo_run(usingcd <path_to_directory>) - copy/paste the following command, replacing the values for the Workflow Version and Study ID in
< >with the values from step 2 and 3 respectively.
labid register wfrun \
    --indir . \
    --workflow-version <ID OF WORKFLOW VERSION (see step 2)> \
    --study <ID OF STUDY (see step 3)> \
    --samplesheet inputs/samplesheet.csv \
    --samplesheet-header-path fastq_1 \
    --samplesheet-header-path fastq_2 \
    --samplesheet-header-sample-id sample \
    --search-strategy-table search_strategies.csv \
    --parent-children-matching DATASET_NAME \
    --no-input-datasets-in-labid \
    --dry
If the command completes without error, the following information should be printed :
Starting files/directory discovery with sniffer SampleSheetWorkflowRunSniffer. This may take some time, don't close this terminal...
Processing -
DRY-RUN -> this command would submit the following workflow run data:

Workflow run 'nfcore_demo_run_20260421_145804' with :

- 3 Input dataset(s)
- 3 Output dataset(s)
- 1 Config dataset(s)
- 7 Report dataset(s)
- 2 Log dataset(s)

Input : ['Samplesheet for nfcore_demo_run_20260421_145804', 'sample1_PE', 'sample2_SE']
Output : ['sample2_SE_sample2_R1.fastq.gz', 'sample1_PE_sample1_R2.fastq.gz', 'sample1_PE_sample1_R1.fastq.gz']
Config : ['custom.config']
Report : ['multiqc_report.html', 'execution_report_2026-04-08_13-35-20.html', 'execution_timeline_2026-04-08_13-35-20.html', 'pipeline_dag_2026-04-08_13-35-20.html', 'sample2_SE_fastqc.html', 'sample1_PE_1_fastqc.html', 'sample1_PE_2_fastqc.html']
Log : ['.nextflow.log', 'multiqc.log']
If you want to actually submit this workflow run to the server, you can relaunch it without the --dry argument (make sure to also remove the \ from the previous line).
New ingestion task
If you have successfully submitted the workflow run to the server, go to your user tasks, at the top right of the LabID web interface, you should see a new ingestion task with the list of datasets registered.
Step 5 : Inspect the resulting Workflow Run in LabID
You can find the resulting Workflow Run in LabID from the left side of the interface, under Workflows > Workflow Runs.
When passing a samplesheet or using the GenericWorkflowRunSniffer, the Workflow Run are named like the run directory, followed by a timestamp. If you named your run directory like in this tutorial, you should find a Workflow Run named like nfcore_demo_run_*** in the list.
You can also use the text box at the top of the Name column to filter the list of workflow runs.
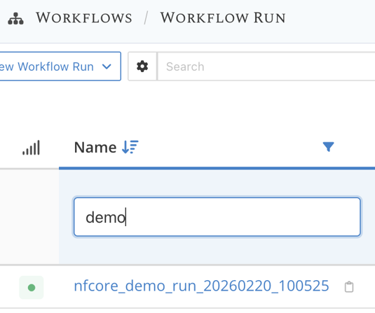
- Go to the page of the newly created workflow run, by clicking on its name.
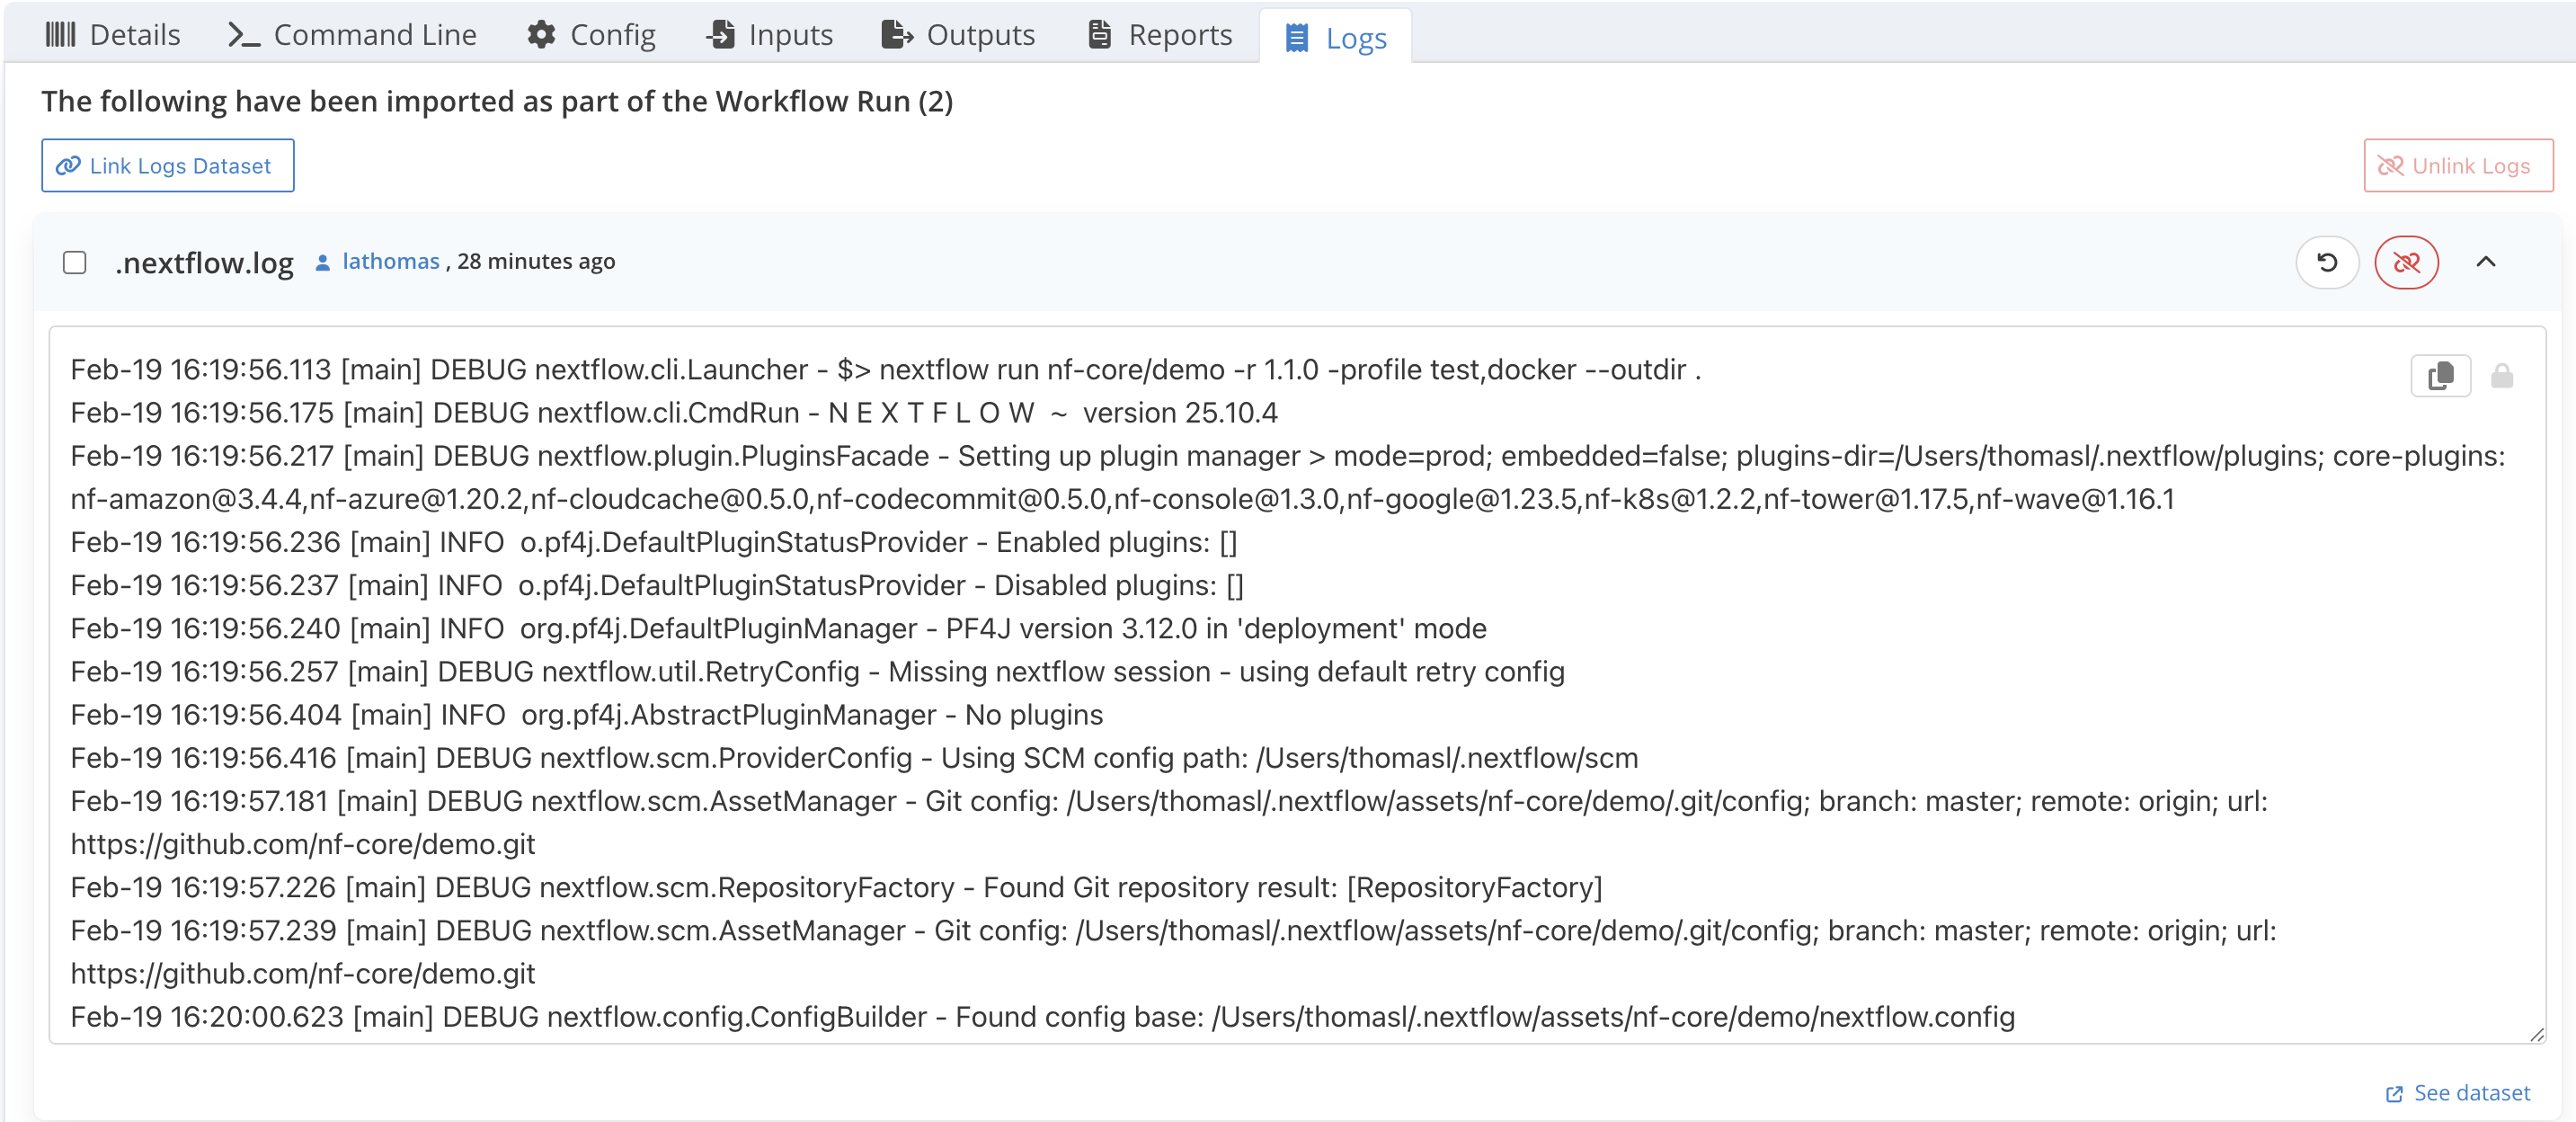
- Check out the different dataset tabs Outputs, Reports and Logs tab of the workflow run, you should see the same dataset name reported by the command above
- For Logs and Reports, you can click the , on the right side of a dataset to show a preview of the file content
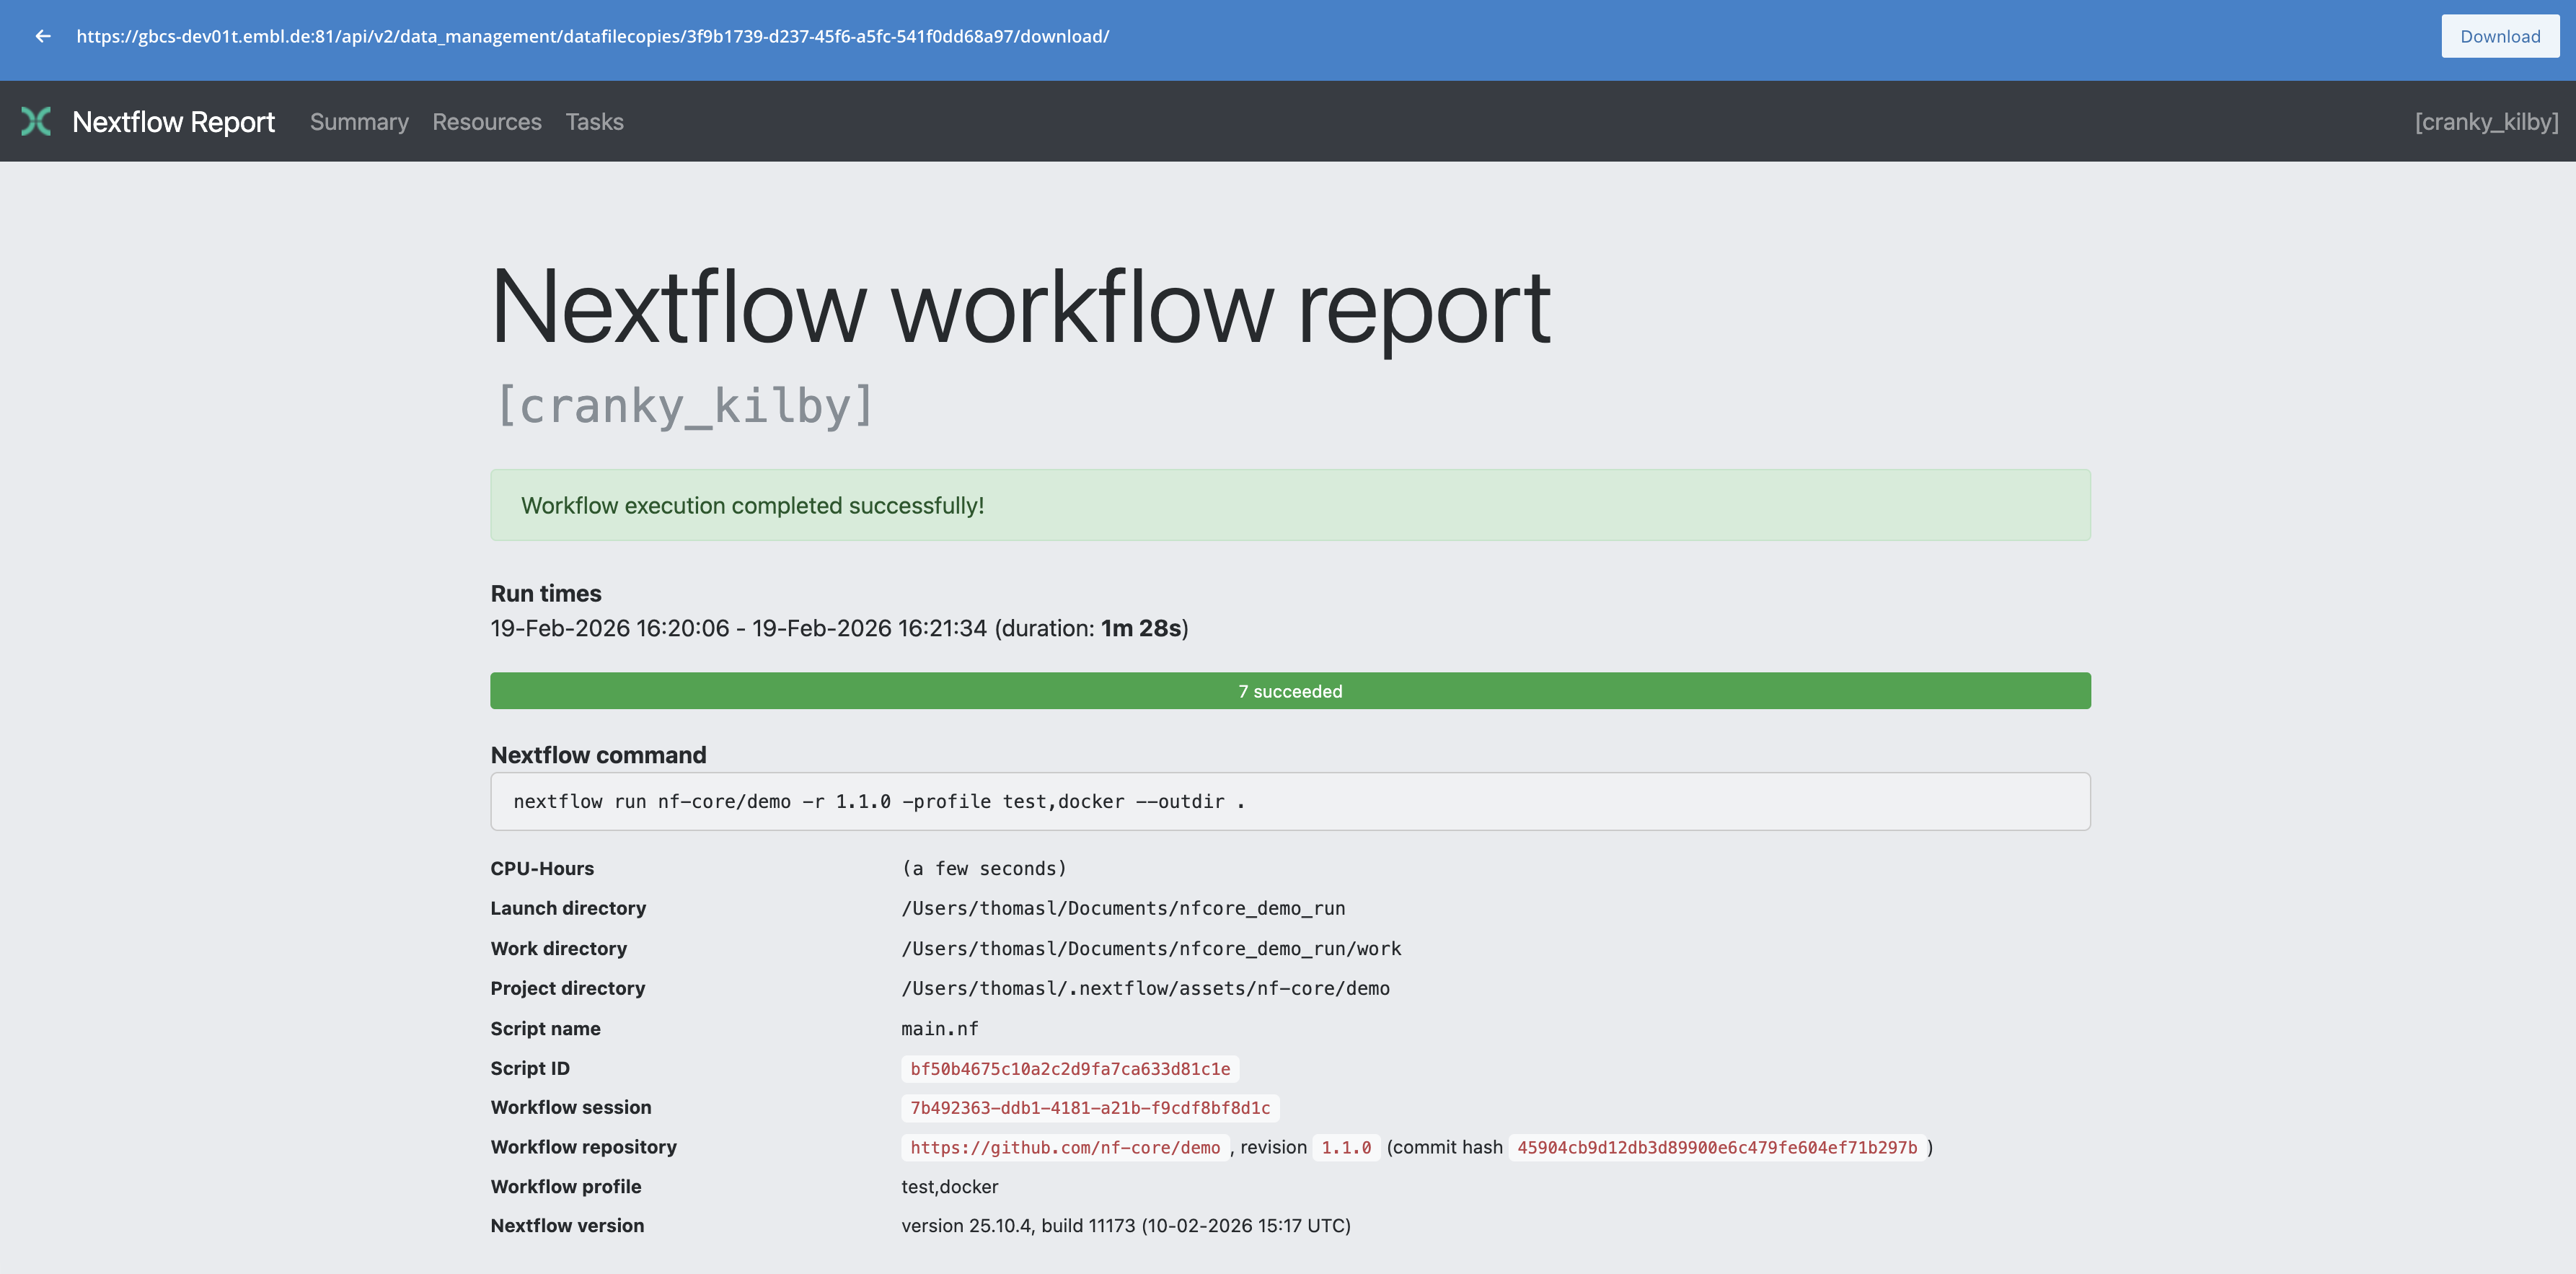
Step 6 : Open the HTML reports from LabID
The preview is convenient for the logs, for the HTML reports you can instead directly open the interactive report in your browser.
- extend the
execution_reportlisted in the Reports tab by clicking the on the right - click the See dataset at the bottom right
- once on the dataset page, scroll down to the Datafile copies
- click on the path in the column URI of the datafile copy to go to its detail page
- Finally at the top right of the datafile copy page, click View File, this will open a new browser tab with the report.
You can do the same with the multiqc HTML report.
Register the workflow run as a RO-Crate
Nextflow supports an additional option when executing the workflow, that allows generating a Workflow Run RO-Crate thanks to the nf-prov plugin. With this option, a special json file is written in the run directory, providing extensive metadata information.
The LabID CLI has a dedicated command (labid register wfrun_crate) and Workflow Run Sniffers for such RO-Crate, that will automatically discover which files to register thanks to the information contained in this json file.
Workflow Run RO-Crates are available for other workflow managers too
Other workflow execution platforms such as Galaxy have the option to generate RO-Crates for Workflow Runs. For Galaxy, we however recommend to directly use the Galaxy integration in LabID to import workflow runs (see Importing workflow invocations from Galaxy).
Step 1 : Re-execute the workflow with the nf-prov plugin
To have Nextflow generate a Workflow Run RO-Crate for the run, we need to pass a custom configuration file that will activate the nf-prov plugin and specify some plugin options.
If you already use a configuration file for Nextflow, you can directly add the additional information below.
Otherwise, in the run directory, create a new file called prov.config.
-
In a terminal opened in the run directory, the file can be created with :
-
In the text editor, add the following content :
This is a minimal plugin configuration, additional attributes are available to document authors, organization... (see here)
Now we can restart the workflow, passing the custom configuration file, and the -resume flag so the previously computed results are directly reused.
- From a terminal in the run directory.
After execution, you should see a number of new files :
-
ro-crate-metadata.json This is the main json file describing the workflow run and key files of the workflow
-
README.md
This is the README from the nf-core/demo github repository -
main.nf
This is the main workflow file or "entry point" file. -
nextflow.config
The default configuration used besides the prov.config. -
nextflow-schema.json
These files were copied by the nf-prov plugin, to ensure the run directory complies with the Workflow Run RO-Crate specification.
With nf-prof plugin, outdir must be the working dir !
When using the nf-prov plugin, the command will fail (or raise a warning) if the argument --outdir is different from the current working directory. This is most likely to ensure that all files required to document the workflow run are in the output directory (a RO-Crate must be self-contained i.e contain all the files and folders described in the main json file).
Step 2 : Register the workflow run (a second time)
This time we will use the function register wfrun_crate which is dedicated to register workflow runs coming as RO-Crate.
Here we dont need to pass any search strategy, this command uses a so-called WorkflowRunCrateSniffer and automatically extracts the list of files to register and their type (input, output...) from the json file.
For Nextflow runs, it also extracts the unique run name from the log of the run.
labid register wfrun_crate \
    --indir <PATH TO YOUR USER-DROPBOX>/nfcore_demo_run \
    --workflow-version <UUID OF WORKFLOW VERSION (see step 2)> \
    --study <UUID OF STUDY (see step 3)> \
    --dry
When executed with the --dry parameter, the command should print the list of datasets discovered.
Again you can remove this flag (and the previous \) to actually submit the data to the server.
You should get something similar to the following :
DRY-RUN -> this command would submit the following workflow run data:

Workflow run 'nf-core/demo [evil_hamilton]' with :
- 4 Input dataset(s)
- 5 Output dataset(s)
- 1 Config dataset(s)
- 4 Report dataset(s)

Input : ['sample1.fastq', 'sample2_R1.fastq', 'samplesheet.csv', 'nf_core_demo_software_mqc_versions.yml']
Output : ['sample1_PE_sample1_R2.fastq.gz', 'sample1_PE_sample1_R1.fastq.gz', 'sample2_SE_sample2_R1.fastq.gz', 'multiqc_data', 'multiqc_plots']
Config : ['Resolved Nextflow configuration']
Report : ['sample1_PE_2_fastqc.html', 'sample1_PE_1_fastqc.html', 'multiqc_report.html', 'sample2_SE_fastqc.html']
Use custom filters to adjust the file discovery
You can see above that the list of inputs above mentions a .yml file which is not really expected here as it is rather providing infos about the execution environment. We can configure the command to filter out this file by passing a custom value to --regex-input.
Here is a slightly modified version of the command with the additional flag, configured to accept input files with extension .fastq.gz or .csv.
labid register wfrun_crate \
    --indir <PATH TO YOUR USER-DROPBOX>/nfcore_demo_run \
    --workflow-version <UUID OF WORKFLOW VERSION (see step 2)> \
    --study <UUID OF STUDY (see step 3)> \
    --regex-input ".*\.(fastq.gz|csv)" \
    --dry
which should yield something like below.
See that we now only have 3 input datasets listed, the yml file was correctly filtered out.
DRY-RUN -> this command would submit the following workflow run data:

Workflow run: nf-core/demo [evil_hamilton]
Workflow (version) : nf-core/demo/ (Version 1.0.2 (db7f526))

Datasets:
- 5 Input dataset(s)
- 5 Output dataset(s)
- 1 Config dataset(s)
- 4 Report dataset(s)

Input : ['samplesheet.csv', 'nf_core_demo_software_mqc_versions.yml', 'sample1_R2.fastq.gz', 'sample2_R1.fastq.gz', 'sample1_R1.fastq.gz']
Output : ['multiqc_plots', 'sample2_SE_sample2_R1.fastq.gz', 'sample1_PE_sample1_R1.fastq.gz', 'multiqc_data', 'sample1_PE_sample1_R2.fastq.gz']
Config : ['Resolved Nextflow configuration']
Report : ['sample1_PE_2_fastqc.html', 'sample1_PE_1_fastqc.html', 'sample2_SE_fastqc.html', 'multiqc_report.html']
Export Workflow Run RO-Crate
If you re-export the Workflow Run RO-Crate from LabID, by clicking the button on the workflow run page, a new crate will be generated ! You can retrieve the original crate, by just copying the directory from the LabID storage volume : you can retrieve the location of this directory by looking up the path of one of the contained datafile copy.