Hands-on: Execute and register an image-conversion workflow run from a terminal
- 1h
- Advanced
In this tutorial, we will revisit the previous tutorial to register an image-conversion workflow. This time we will start the image-conversion workflow from a terminal, after having registered an example input image in LabID. We will then register a Workflow Run representing the image-conversion, using the LabID command line executable. A single command will :
- Register the converted images as new datasets
- Create a Workflow Run representing the image-conversion that was just executed
- Associate the datasets of the input and freshly converted images to the Workflow Run
- Link the datasets of the converted images to their parent image dataset (parent-child relation)
This tutorial details each step of this "conversion workflow", calling one command at a time.
At the end of this tutorial, you will find a python script automating the full process : getting the data from LabID, converting the images, and registering the Workflow Run.
In general, this tutorial is good to learn how to use data registered in LabID in workflows, and how to establish parent/child relations between datasets of a workflow run.
Prerequisites
Before starting this tutorial, make sure to have a Workflow Version for EuBi Bridge in your LabID instance. Instructions are described here.
You also need to install EuBi Bridge for the image-conversion and the LabID CLI (see below).
Important
You can install both the LabID CLI and EuBI Bridge in the same environment, or create separate ones for each software, but that means jumping between them to follow this tutorial.
Install EuBI Bridge
We will follow the installation instructions for EuBI Bridge version 0.1.0c4.
-
start by creating an environment, named
eubizarrconda create -n eubizarr "openjdk=11.*" maven python=3.12 -
activate the environment and install eubi-brige using pip
-
check the installation with
eubi -h
Alternative : install the UI with EuBi Bridge[all]
If you plan to use EuBi Bridge after this tutorial, then you can install the full package including a user-interface by replacing in the square brackets cli with all in the pip install ... command. You can then start the ui from a terminal, after activation of the environment, with the command eubi-gui.
Install the LabID CLI (Command Line Interface)
If you are based at the EMBL, you can use the central installation on the g drive (explained here), just make sure to configure it to use the demo server (see here).
Otherwise, the installation and configuration is described in this getting started tutorial.
You can skip the environment creation step (use the same environment eubizarr above).
Step 1 : Download the example image
We will use an example image from a Zeiss microscope in czi format, that we will convert to ome-zarr.
- Click on the following link to download a zip containing the image
- Move the zip file from your Downloads folder to your LabID user dropbox
- Unzip the zip file
- Rename the unzipped directory to something like
image_conversion_cli
You should now have a subdirectory image_conversion_cli in your user dropbox, and this subdirectory should contain a single czi file named PK2_ATH_10to200_20240705_AM_01.czi. On Windows, you might find a directory __MACOSX next to the image, you can ignore it.
We will use the image_conversion_cli directory as our main "run directory" for the image-conversion.
Where is my LabID user-dropbox ?
You can check what's the user currently configured for the CLI and the path to the dropbox with
labid config show --verbose
About the example image
This image was acquired as part of the EMBL's TREC expedition. The czi images were converted to ome-zarr using a similar pipeline as this tutorial and published in BioImage Archive (see here).
Step 2 : Register the input image in LabID
Let's register the czi image we just downloaded, as a raw datatset in LabID.
Raw datasets are associated to an assay, that captures the experimental parameters used to generate the data. Here we are going to use a fictive imaging assay.
The steps to register the image as a raw dataset are explained in step 1 of a previous tutorial. You can follow the same procedure. The last point covers the registration of the ome.zarr, we have not converted the image yet so you can ignore this last substep.
Step 3 : Retrieve the Study ID
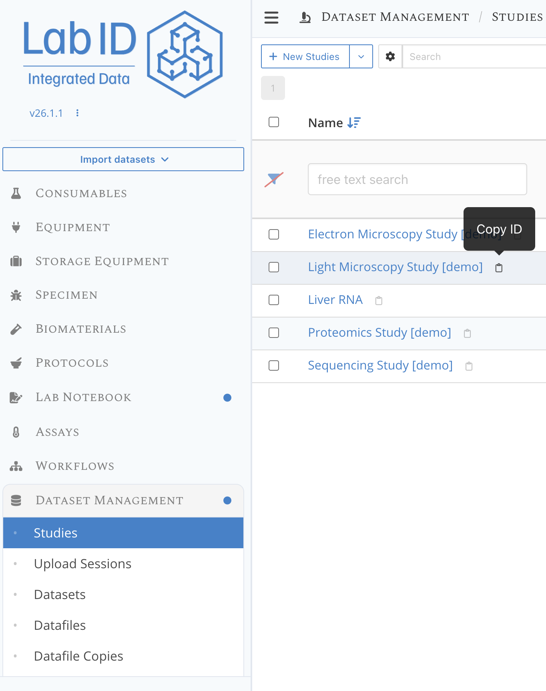
If you followed the same step than the tutorial to register the image as a raw dataset, then the image should be in the Light Microscopy Study [demo]. We will need the unique identifier of this Study in LabID for the next step. Here is how you can retrieve its ID:
- go to the Study list page
- click the clipboard icon next to the name of the study
- paste the value somewhere so you can use it later (in a text editor for instance)
The study from the demo server has for instance the ID c09f5be-558f-426f-a17f-0a865cfe9430.
Step 4 : Get the image location from LabID
Once the image was registered, we can retrieve from LabID its location on disk and its dataset ID.
We are going to use the command labid export study from the LabID command line interface.
This command creates a tabular file listing all files and folders (the datafiles) registered in the study.
- open a terminal in the
image_conversion_clidirectory - copy/paste the following command, eventually replacing the value after
--studywith the ID you copied at the previous step
labid export study --study 1da4a2a5-907e-4165-bb07-f50f03668043 \
    --format biatable \
    --odir . \
    --filename study_table.tsv
This should create a file study_table.tsv in the run directory.
How do I open a terminal in the run directory ?
On Mac, from the Finder either right-click on the directory, under services, click one of the "New Terminal at folder". Alternatively, open the terminal program and use successive cd commands to navigate to the directory. This also applies to Linux. On windows you can navigate to the directory, type cmd in the address bar of the file browser and press Enter.
Use --help for documentation
You can consult the documentation for this function with labid export study --help.
What does --odir . means?
The option --odir is the output directory to use to save the tabular file. We pass the value . which is the active directory of the terminal, here image_conversion_cli.
We can have a look at the first rows of the table using the following command :
Note : press q to exit the preview
You could also use the simpler head command, but the one above provides a more readable preview for tsv.
Open with default program instead
You can also open the file with the default program for csv configured on your machine with open study_table.tsv
If you use the official LabID demo instance, and the study used at step 2, you should get something like the following.
Dataset ID                            Dataset                            Type     Study ID                              Study                          File Name                          FilePath
54e7da75-4334-4a2e-a288-141578698e19  original_image_converted.ome.zarr  generic  1da4a2a5-907e-4165-bb07-f50f03668043  Light Microscopy Study [demo]  original_image_converted.ome.zarr  /app/labid/storage/volumes/Demo/Data/Other/2026/2026_04_22_12_27_40.36_demo/image_conversion/original_image_converted.ome.zarr
7406b8f4-42ac-4ed0-a60f-da411080386e  original_image.czi                 generic  1da4a2a5-907e-4165-bb07-f50f03668043  Light Microscopy Study [demo]  original_image.czi                 /app/labid/storage/volumes/Demo/Data/Other/2026/2026_04_22_12_27_40.36_demo/image_conversion/original_image.czi
This table lists each datafile available in the study, the UUID of the dataset it is part of (Dataset ID), the path of the datafile in the LabID storage volume (column FilePath), and other file information and metadata available.
A datafile can also be listed multiple times !
The export study command support other format such as tabular instead og biatable. In this case a datafile can be listed multiple times, for instance when the parent dataset was produced by a light microscopy assay for which multiple channels were defined. The biatable format makes sure we have only a single row per datafile.
Step 5 : first image-conversion
The czi file used for this tutorial contains multiple scenes i.e independant 2D images, which we will convert separately (argument --scene_index of the conversion command).
Let's convert the first scene to ome-zarr.
- we first create a subdirectory
omezarrin our run directoryimage_conversion_clito store the converted images. You can do this in your file browser, or from the same terminal you used at the previous step :mkdir omezarr
The conversion command is in the form
eubi to_zarr <input_folder_or_image> <output_folder>
We will pass as input, the path to the czi file listed in the study_table.tsv under column FilePath.
- copy the path to the czi file from the
FilePathcolumn of the study table - execute the following command replacing
<PATH CZI>with the copied path
eubi to_zarr <PATH CZI> omezarr --scene_index 0
This should create a new .zarr directory in the omezarr subdirectory, with the same name than the input czi file.
Why not converting the image we just downloaded ?
While we could have just converted the example image we downloaded at step 1, the idea of this tutorial is to show how to use data already registered in LabID. It often happens that the raw data is first registered in LabID and only later processed by a workflow, in which case you would start with step 3 : exporting the information you need for your workflow from LabID.
About OME Zarr
A zarr dataset is actually a directory containing a bunch of small binary files called chunks, stored following a specific directory hierarchy.
Open the OME Zarr in Fiji
If you have Fiji installed on your machine, you can try opening the zarr dataset using File › Import › HDF5/N5/Zarr/OME-NGFF...
Step 6 : Rename the zarr directory
Now if we would convert the next scene of that czi image, the converted data would also be named according to the czi file, without any indication of the scene, and thus would overwrite the data from the previous conversion. So unless this changes in future versions of EuBI Bridge, to prevent overwriting the data with following conversions, we should rename the .zarr directory to include the index of the scene.
Let's also use the extension .ome.zarr instead of .zarr, just to provide more context: .zarr is a generic format to store data, while ome.zarr is a declination of zarr for imaging.
We can use the command mv oldname newname to rename the directory.
From the run directory, execute the following command :
mv omezarr/PK2_ATH_10to200_20240705_AM_01.zarr omezarr/PK2_ATH_10to200_20240705_AM_01_scene1.ome.zarr
Note
While the scene index starts at 0 for the command line argument (programing convention). For the directory name we will start at 1.
No need to rename when converting all scenes with --scene_index all!
Instead of converting each scene one by one, one can convert all scenes at once by passing all instead of a single index.
With this option, the converted ome.zarr will actually have the scene index in the name, so there is no need to rename the directories.
Converting all scenes can be time-consuming though, so in this tutorial we will keep using the scene index.
Step 7 : Convert the second scene of the same czi
Let's now convert the second scene:
eubi to_zarr <PATH CZI> omezarr --scene_index 1
Again we would need to rename the .zarr directory to avoid issue with the following scene conversion.
For simpler datasets for which there is no scene involved, you could use a wild card pattern to automatically convert a bunch of files at once with a single command.
Example if we had a single integer value for the image :
eubi to_zarr image_*.czi omezarr
If we want to convert all the czi listed in the study_table.tsv, we would need to write a small script to loop over the rows.
Here is an extract of a python script doing just that :
import pandas as pd
import subprocess
from pathlib import Path

N_SCENES_PER_CZI = 2  # number of scenes to convert per czi file
run_dir = Path(<YOUR RUN DIR>)
output_dir_zarr = run_dir / "omezarr"


# Load study table as a pandas dataframe
study_table = pd.read_csv(run_dir / "study_table.tsv", sep="\t")
N_CZI_TO_CONVERT = len(study_table)

# Loop over the first few czi files in the study table and convert them to ome.zarr
czi_counter = 0
for _, row in study_table.iterrows():

    filepath_czi = Path(row[COLUNM_FILEPATH_CZI])
    print(f"Converting CZI file {czi_counter+1}/{N_CZI_TO_CONVERT}: {filepath_czi}")

    for scene_idx in range(N_SCENES_PER_CZI):

        print(f"  - Converting scene {scene_idx+1}/{N_SCENES_PER_CZI}")

        # Run the conversion command
        try:
            subprocess.run(f"eubi to_zarr {filepath_czi} {output_dir_zarr} --scene_index {scene_idx}", shell=True, check=True, cwd=run_dir)

            # Check the zarr folder was created and rename it to a unique name including the scene index
            # this is needed because we get several omezarr per czi (one per scene)
            # and eubi bridge names the zarr folder after the czi file only
            # so if not renaming the different scene would end up in the same folder, overwriting each other
            folder_converted_zarr = output_dir_zarr / f"{filepath_czi.stem}.zarr"
            if not folder_converted_zarr.exists():
                raise FileNotFoundError(f"Expected folder {folder_converted_zarr} not found after conversion.")

            print(f"Successfully converted scene {scene_idx} of {filepath_czi.name} to ome.zarr : {folder_converted_zarr}")

            new_folder_name_with_index = output_dir_zarr / f"{filepath_czi.stem}_scene{scene_idx+1}.ome.zarr"
            folder_converted_zarr.rename(new_folder_name_with_index)
            print(f"Renamed folder to unique name (with scene index) : {new_folder_name_with_index.name}")

        except subprocess.CalledProcessError as e:
            print(f"Error converting scene {scene_idx} of file {filepath_czi.name}: {e}")

    czi_counter += 1
Step 8 : Register the workflow run with the converted images
If you managed to convert at least one scene, we can now register a workflow run with the data using the LabID CLI.
We will use the command labid register wfrun that we used in a previous tutorial.
The command will create a new Workflow Run on the server and link the czi image as input to the workflow run. It will also create new datasets for the ome.zarr data, and link them as output to the workflow run. The command will also associate the ome.zarr to their parent czi dataset.
Here is the full command to do that, the description of the argument follows.
labid register wfrun \
       --indir . \
       --workflow-version <WORKFLOW_VERSION_UUID> \
       --samplesheet study_table.tsv \
       --samplesheet-header-path FilePath \
       --study-of-inputs <STUDY_UUID> \
       --study <STUDY_FOR_OMEZARR> \
       --sniffer-param "strategy-output=(omezarr, folder, false, *.ome.zarr)" \
       --parent-children-matching DATASET_NAME \
       --dry
Ensure study_table.tsv only list the example czi file !
When specifying --samplesheet, all the paths listed in the column passed to --samplesheet-header-path will be linked as input datasets to the workflow run.
If you registered the example image in an existing study, the file study_table.tsv might list additional files. In this case, edit the file to only keep the row(s) with the example czi file.
Use --help for documentation
you can call labid register wfrun --help to get the documentation for this command, with the list of supported parameters.
Like in the rest of the tutorial, the terminal is set to the run directory.
We thus pass to the argument --indir, the value . for the active directory.
Next, the command expects the UUID of the Workflow Version used for the workflow run, here this should be the Workflow Version for EuBI Bridge (see Prerequisites).
We then use the argument --samplesheet together with --samplesheet-header-path to indicate where to find the path(s) to the input data (here the path to our example image, in the column Filepath of the file study_table.tsv).
The czi image listed in the samplesheet is already registered in LabID.
The register wfrun command currently uses the paths listed in the column specified by --sample-sheet-header-path to retrieve the reference to the existing datasets on the server (i.e instead of creating new datasets).
The argument --study-of-inputs is used here to specify that the command should look for these datasets in the given study only.
Argument --samplesheet-header-sample-id
The samplesheet supports an additional optional argument --samplesheet-header-sample-id.
When the input data is not registered in LabID, the command creates new datasets for the inputs, this argument can be used to provide a custom identifier (i.e name) for these datasets.
The value of this argument should be the name of a column containing a dataset identifier (like a sample name).
When the data already exists in LabID, this argument is ignored, and thus is not provided in the example above.
--study
This should be the uuid of the study in which the output datasets (here the omezarr images) should be registered.
You can use the same study for both inputs and outputs of the workflow, in this case it's enough to pass only once --study.
--sniffer-param
--sniffer-param defines here the search strategy to use to identify output datasets from the run directory.
This previous example explains in more detail how this search strategy is built.
In short, here we pass the value (omezarr, folder, false, *.ome.zarr) to set that the search should be within the subdirectory omezarr of the run directory, that it should look for folders within this directory only (and not within subdirectories i.e recursive=false).
The last element *.ome.zarr is the glob (or wildcard) pattern used to identify output directories, here any directory ending with "ome.zarr" will be registered as a new dataset and associated as output to the workflow run.
--parent-children-matching
This parameter defines how to establish parent/children relation between datasets of the workflow run.
Here we will associate each omezarr to the parent czi image.
The value DATASET_NAME means that the children datasets are expected to have the same name or start with the name of the parent dataset.
This reflects the common practice of adding a suffix to the name of files or folder deriving from an input file. Here the omezarrs just have a suffix with the scene index compared to the parent czi file (*.sceneX.ome.zarr).
Due to the multiple scenes within a czi, a given czi will have multiple child omezarr.
This is a ONE_TO_MANY parent-to-child relationship, which is the default value for the argument --parent-children-matching-plurality that it thus omitted for brevity.
--parent-children-matching can also accept a tabular file
The argument --parent-children-matching also supports establishing parent/children relationship using a tabular file with one column for the paths to parents and one for the associated children paths. It is beyond this tutorial though.
--dry
Finally we pass the --dry argument first to first print the list of datasets that would be submitted to the server.
Feel free to remove it (and the previous \) once the output looks correct.
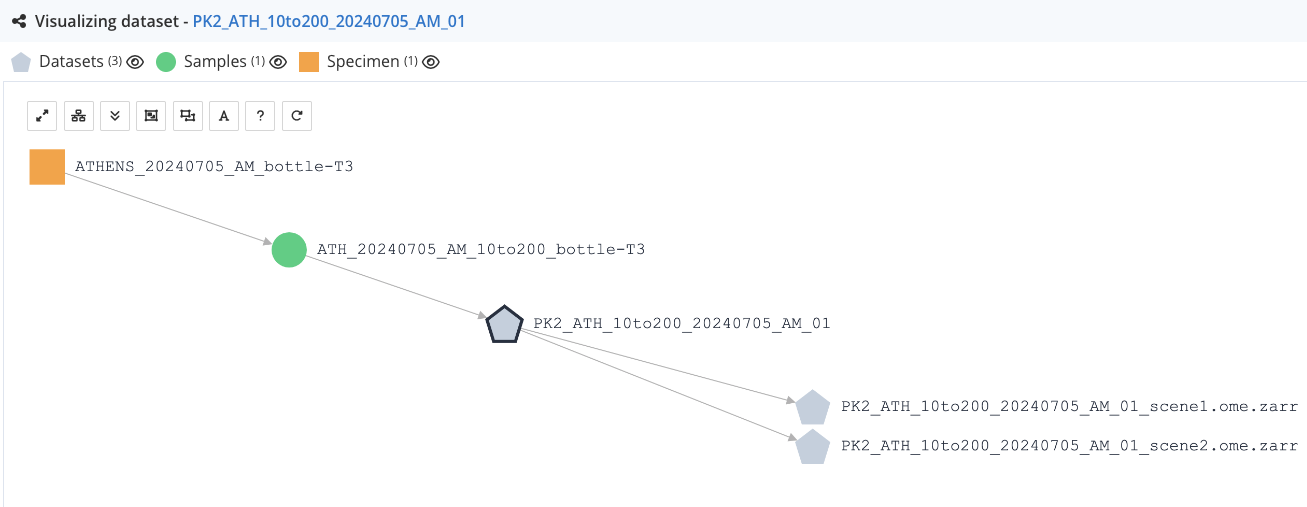
Resulting workflow run
After submission, the resulting Workflow Run in LabID should look like the one "hand crafted" in the previous tutorial.
Below is the view of the lineage viewer when consulting one of the parent czi dataset (PK2_ATH_10to200_20240705_AM_01), after having converted the 2 first scenes and registered the conversion as a workflow run.
You can see the 2 ome.zarr datasets as child of the czi dataset.
Thanks to this parent/child relationship, you can track the provenance of the ome.zarr datasets all the way to the specimen.
Batch conversion in python
So far, this tutorial demonstrates the conversion of just a few images (i.e scenes) from a single czi file. In a more realistic scenario, you would have many of such czi images in the LabID study used for the conversion. The following python script demonstrates how to adapt the instructions to convert all these images in "one go", and register this batch conversion as a single workflow run, referencing the numerous czi and ome-zarr datasets.
The script uses the subprocess module to call the labid functions described in the previous sections.
It also shows how to establish the connection to the server, and how to get the path to the user-dropbox programatically (using the LabID Lib library).
"""
Demo script to convert the czi from a LabID study (Confocal Super Plankton), to ome.zarr format.
Then registering a workflow run with the resulting zarr files back into LabID.

For the sake of simplicity, only a few czi files from the study are converted, and for each of this czi only the first 3 scenes are converted.

REQUIREMENTS
- Followed installation instructions as in README.md (so EuBi Bridge, LabID Lib and LabID CLI are installed and configured)

Running this script will ask for the user password to refresh the LabID token.

The list of czi is retrieved as a csv from a LabID study using LabIDLib.
The csv is saved to a newly created run directory in the user dropbox.

The CZI are then converted using EuBi Bridge.

NOTE
Edit the STUDY_UUID parameters in the script to convert czi from a different study or register the resulting zarr into a different study.

EXECUTION
python convert_czi_to_zarr.py --n-czi 3 --n-scences 2 --dry


TODO save a log ?
"""
from labidlib.api.client import LabidClient, load_config
from labidlib.api.manager import LabidManager
from pathlib import Path
import pandas as pd
import subprocess
from datetime import datetime
import argparse

# Parse command line arguments
parser = argparse.ArgumentParser(description="Convert CZI files to OME-ZARR format and register with LabID")

# Add arg for dry run
# action='store_true' to ensure a boolean flag args.dry is created accordingly
parser.add_argument('--dry', action='store_true', help="Perform a dry run without actually registering the workflow")
parser.add_argument('--n-czi', type=int, default=1, help="Number of CZI files to convert from the study table")
parser.add_argument('--n-scenes', type=int, default=1, help="Number of scenes to convert per CZI file")
args = parser.parse_args()

# Retrieve parameter values
N_CZI_TO_CONVERT = args.n_czi  # number of czi files to convert from the study table
N_SCENES_PER_CZI = args.n_scenes  # number of scenes to convert per czi file

########## CONSTANTS ##########
FILENAME_STUDY_TABLE = "study_table.tsv"
"""Filename for the study table exported from LabID."""

FILENAME_SAMPLESHEET = "samplesheet.csv"  # include only the czi files actually converted
"""Filename for the sample sheet including only the czi files actually converted."""

NAME_OUTPUT_ZARR_DIR = "converted_omezarr"
"""Subdirectory in the run dir with the list of ome.zarr directories resulting from the conversion."""

COLUMN_DATASET_NAME = "Dataset"
COLUMN_DATASET_UUID = "Dataset ID"
COLUNM_FILEPATH_CZI = "FilePath"

STUDY_UUID = "156d00db-f758-4ff9-ab9a-2130cf2d0d38"
"""Study Confocal Super Plankton"""

WORKFLOW_VERSION_UUID = "c244b3de-2730-4a92-a472-b3e2efc8e6d4"
"""EuBi Bridge v.jdk-11 - public on prod"""


# Refresh LabID token to avoid authentication issues
# this will ask for the user password in the terminal
print("Refreshing LabID token...")
try:
    subprocess.run("labid config refresh", shell=True, check=True)  # shell=True otherwise wont find labid command
except Exception as e:
    print(f"Could not refresh LabID token: {e}. Make sure LabID CLI is installed and configured in the environemnt. Try 'labid config show' to check configuration.")

# Load LabID configuration
# needed to connect to the server and retrieve study data
path_labid_config = Path.home() / ".labid" / "labidapi.yml"
labid_manager = LabidManager(client=LabidClient(load_config(path_labid_config)))

# Create a unique run dir in the user dropbox
list_dropbox = list(labid_manager.list_dropboxes().values())
dropbox = Path(list_dropbox[0])

# Try to create a unique run dir in the user dropbox
# should fail if not having write permissions
# Also create an output dir for the zarr files
run_dir = dropbox / f"conversion_czi_to_zarr_{datetime.now().strftime('%Y%m%d_%H%M%S')}"
output_dir_zarr = run_dir / NAME_OUTPUT_ZARR_DIR

# Create both the run dir and the output zarr dir in one go
output_dir_zarr.mkdir(parents=True, exist_ok=False)
print(f"Created new run directory in user-dropbox: {run_dir}")


# Retrieve a table with the study information
print("Fetching study dataset table...")
subprocess.run(
    f"labid export study --study {STUDY_UUID} --format biatable --odir {run_dir} --filename {FILENAME_STUDY_TABLE}",
    shell=True,  # shell=True otherwise wont find labid command
    check=True,  # raise a process error if command fails
)

# Load study table as a pandas dataframe
study_table = pd.read_csv(run_dir / "study_table.tsv", sep="\t")

# Keep only rows of the dataset actually converted
# also remove unwanted columns, then save this as a "samplesheet"
study_table = study_table[[COLUMN_DATASET_UUID, COLUMN_DATASET_NAME, COLUNM_FILEPATH_CZI]].head(N_CZI_TO_CONVERT)

# Save this as a "samplesheet.csv"
# this is just a filtered version of the study table
# including only the path of the czi actually converted
study_table.to_csv(run_dir / FILENAME_SAMPLESHEET, index=False)

# Loop over the first few czi files in the study table and convert them to ome.zarr
czi_counter = 0
for _, row in study_table.iterrows():

    filepath_czi = Path(row[COLUNM_FILEPATH_CZI])
    print(f"Converting CZI file {czi_counter+1}/{N_CZI_TO_CONVERT}: {filepath_czi}")

    for scene_idx in range(N_SCENES_PER_CZI):

        print(f"  - Converting scene {scene_idx+1}/{N_SCENES_PER_CZI}")

        # Run the conversion command
        try:
            subprocess.run(f"eubi to_zarr {filepath_czi} {output_dir_zarr} --scene_index {scene_idx}", shell=True, check=True, cwd=run_dir)

            # Check the zarr folder was created and rename it to a unique name including the scene index
            # this is needed because we get several omezarr per czi (one per scene)
            # and eubi bridge names the zarr folder after the czi file only
            # so if not renaming the different scene would end up in the same folder, overwriting each other
            folder_converted_zarr = output_dir_zarr / f"{filepath_czi.stem}.zarr"
            if not folder_converted_zarr.exists():
                raise FileNotFoundError(f"Expected folder {folder_converted_zarr} not found after conversion.")

            print(f"Successfully converted scene {scene_idx} of {filepath_czi.name} to ome.zarr : {folder_converted_zarr}")

            new_folder_name_with_index = output_dir_zarr / f"{filepath_czi.stem}_scene{scene_idx+1}.ome.zarr"
            folder_converted_zarr.rename(new_folder_name_with_index)
            print(f"Renamed folder to unique name (with scene index) : {new_folder_name_with_index.name}")

        except subprocess.CalledProcessError as e:
            print(f"Error converting scene {scene_idx} of file {filepath_czi.name}: {e}")

    czi_counter += 1

# After conversion, register a workflow run with the resulting zarr files back into LabID
cmd = ('labid register wfrun '
       f'--indir "{run_dir}" '
       f'--workflow-version "{WORKFLOW_VERSION_UUID}" '
       f'--study "{STUDY_UUID}" '
       '--samplesheet samplesheet.csv'
       '--samplesheet-header-path FilePath'
       '--sniffer-param "strategy-output=(converted_omezarr, folder, false, *.ome.zarr)" '
       '--parent-children-matching DATASET_NAME')

if args.dry:
    cmd += ' --dry'

print("Registering workflow run with the resulting ome.zarr files into LabID...")
print(cmd)

try:
    subprocess.run(cmd, shell=True, check=True)
    print("Successfully registered workflow run into LabID.")
except subprocess.CalledProcessError as e:
    print(f"Error registering workflow run into LabID: {e}")