Hands-on: Registering a workflow run : image-conversion
- 25 min
- Medium
This tutorial illustrates how to register a workflow run via the web interface of LabID. It uses an image-conversion workflow as example (EuBI Bridge), converting from a proprietary format like .czi from Zeiss microscope to .ome.zarr.
The tutorial does not cover the execution of the worfklow, rather the registration of the workflow run after its execution. The tutorial can be followed with test data available on the demo server instance.
Software for ome.zarr conversion
Such image conversion can be performed with software like the NGFF converter or command line tools like BatchConvert, EuBI Bridge. Here we will use EuBI Bridge, but the same instructions would work with the others too.
Step 1 : Register the test data
Before creating a workflow run representing the conversion, we need to register in LabID the data that we want to associate to the workflow run, i.e the image that was converted and the OME-Zarr resulting from the conversion.
For the sake of the example, we will create a workflow run with a single czi file yielding a single ome.zarr, so we have in total 2 datasets : 1 input and 1 output.
The example .czi and .ome.zarr are available on the demo server, in the user dropbox.
About the image-conversion
In a more realistic use-case, you would have multiple input images to convert, and in some cases a single input image can also yield multiple ome.zarr (ex : with czi files containing multiple scenes each exported as invididual ome.zarr).
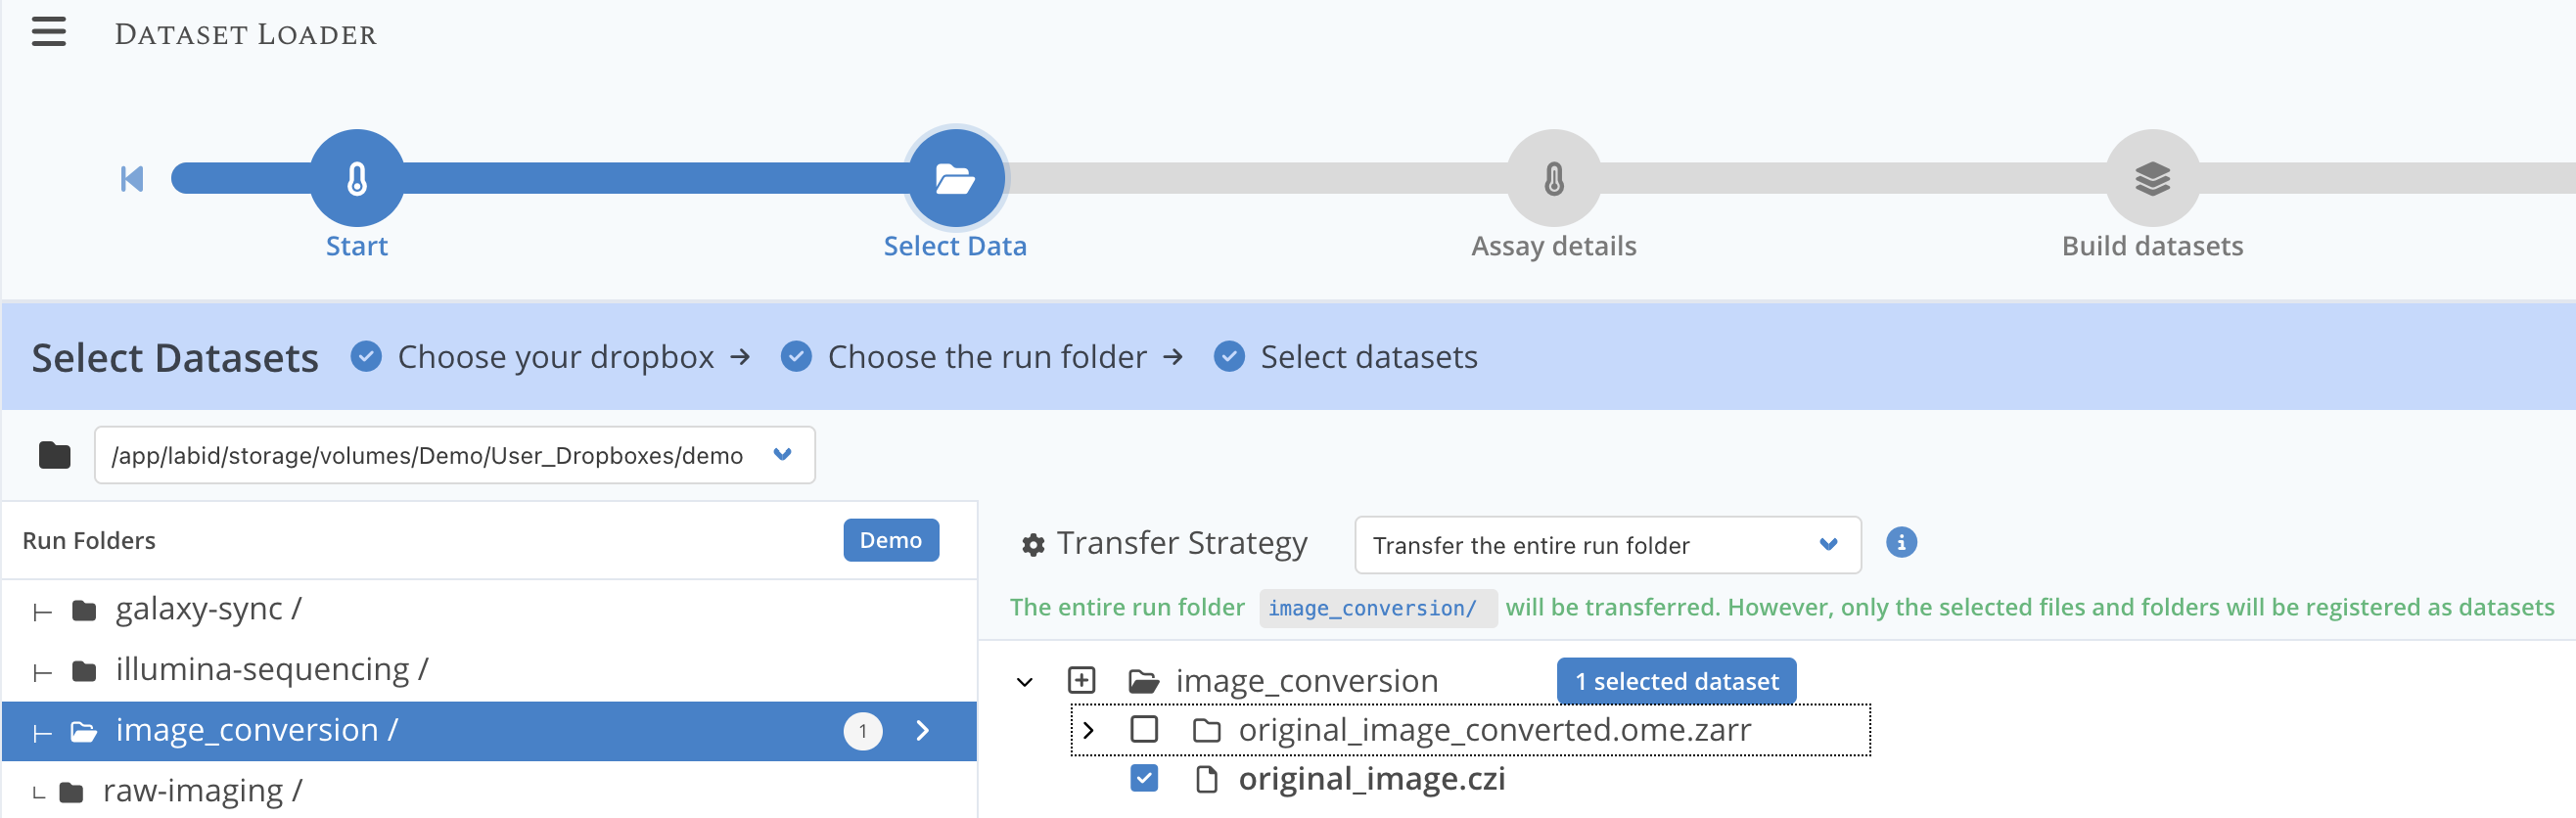
Step 1.1 : Select the czi file in the data loader
- from the LabID user interface, click on the top left on "Import datasets" then select "Import raw datasets"
- in the Select Assay Type dialog, select Light microscopy then click Continue without template
- next in the Select Datasets dialog, for the dropdown Select dropbox, choose the first entry ending with "User_Dropboxes/demo"
- then under Run folders, select the
image_conversion/directory - for the dropdown Transfer strategy select Transfer the entire run folder
- in the file browser, extend the directory image_conversion by clicking the arrow on the left, then tick the box for the czi file. Leave the tickbox for the ome.zarr unticked (we will register it at a later stage)
- click Continue at the bottom right
You should now see something like the following :
Step 1.2 : Fill the assay details
In the next dialog, we will fill in the information for the assay, here we will describe a fictive imaging assay that created the czi file. You can fill-in the following :
- Name : "Microscopy imaging of Plankton"
- Imaging Methods : "bright-field microscopy"
-
Instrument : on the right, for Instrument Model select "Light Microscope"
-
Click Continue
- On the next page (step "Build datasets") you can also directly click "Continue"
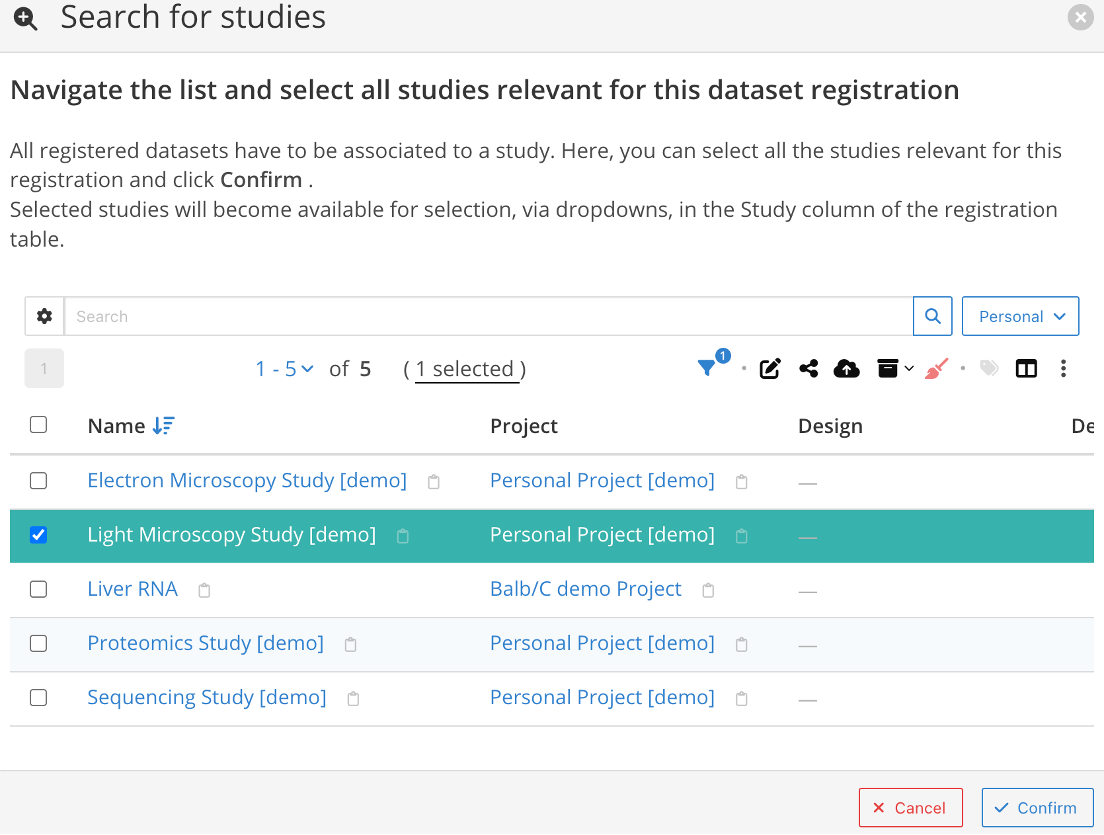
Step 1.3 : Choose a study
You should now be at the step "Verify" of the dataset builder.
- for the dropdown Sample type, choose Sample
- then for Study, click Load
- from the list of studies listed tick the tickbox next to the Light Microscopy Study [demo] (dont click on its name, it would take you to the study detail page)
- click Confirm to close the dialog then again Continue
You should get a popup message letting you know that the data will be registered. You can close this window, and eventually go to the task list of LabID to check that the data was successfully registered.
Step 1.4 : Repeat to register the ome.zarr
You can now follow the same procedure to register the ome.zarr, except that the ome.zarr will NOT be registered as a raw dataset, because it does not derive from an assay.
The only difference is at the beginning when clicking "Import dataset" on the left, choose the option "Import dataset" instead of "Import raw dataset". The registration is a bit simpler, here you wont have to specify an assay, only select a study (same as step 1.3).
Step 2 : Import the workflow version from git
Now that the data is registered we can start "assembling" the component of the workflow run.
We first need to create a Workflow Version in LabID referencing the version of EuBI Bridge used for the conversion.
To do so, follow the instructions to import a workflow from git with the following URL https://github.com/Euro-BioImaging/EuBI-Bridge. The last release should be automatically selected (feel free to select another commit or release, we are not going to execute the workflow so this is not important).
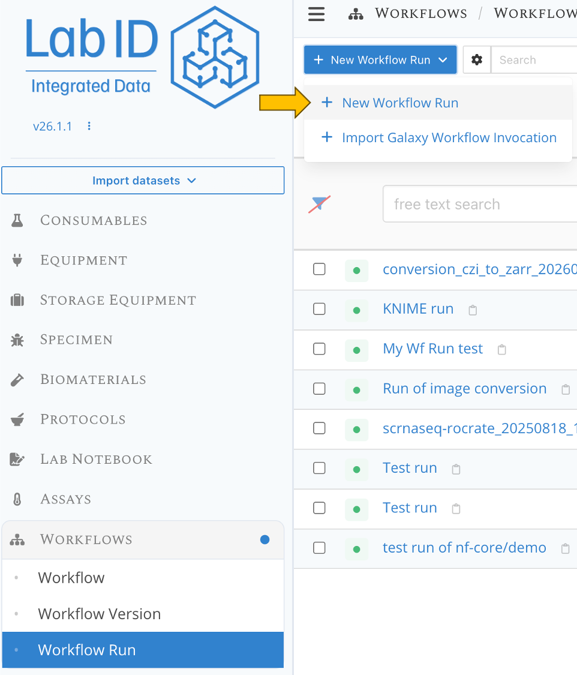
Step 3 : Create the workflow run
Now that both the data and the Workflow Version are registered, we can create a new Workflow Run in LabID.
Here are the steps :
- go the workflow run list page
- click at the top left on New Workflow Run and select New workflow run.
Step 3.2 : Select workflow version and fill-in metadata
Provide information for the 3 required fields:
- a meaningful name for the run ex: "conversion of Plankton images with EuBi Bridge"
- which workflow version was used, here select the workflow version for EuBI Bridge that you imported from git at the previous step
- the status of the run, select "Success"
You can also edit the visibility of this run to other users, just like any other LabID items.
All this fields can be edited at a later time.
Click Save item to finalize the creation of the "blank" workflow run.
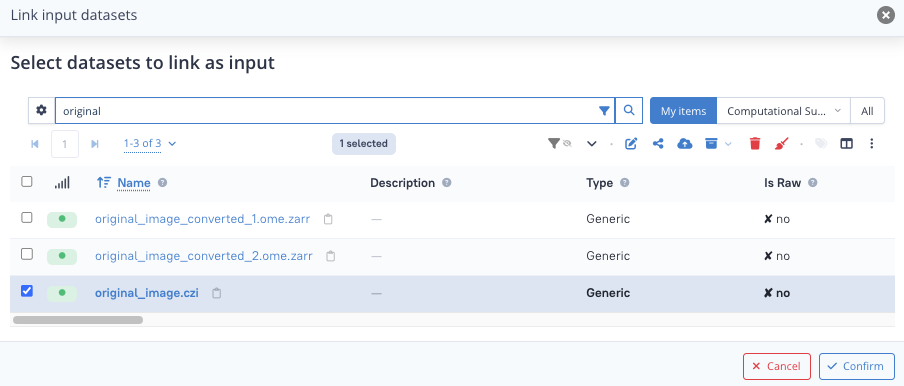
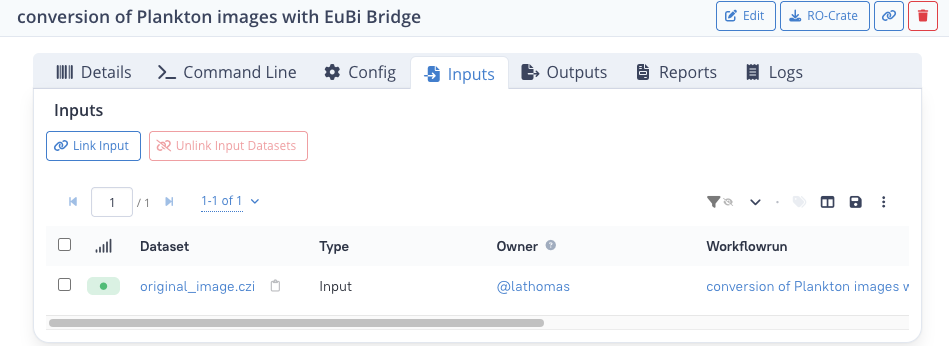
Step 4 : Link the input and output datasets to the workflow run
Now you can link the relevant datasets as inputs and outputs of the run.
Let's start with the input
- click on the tab Inputs
- click on the Link Input button at the top left
- from the list of files, tick the tickbox next to the
.czifile that you registered at step 1 (dont click on the dataset name, it would take you to its detail page) - you can use the search bar on top of the list of datasets to filter the list (see below)
- click Confirm at the bottom right
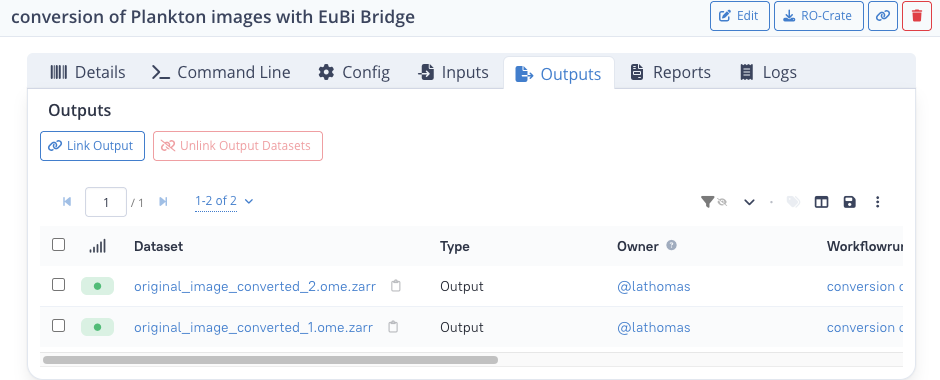
Repeat the same step for the outputs.
In the list of files, this time select the 2 ome.zarr datasets.
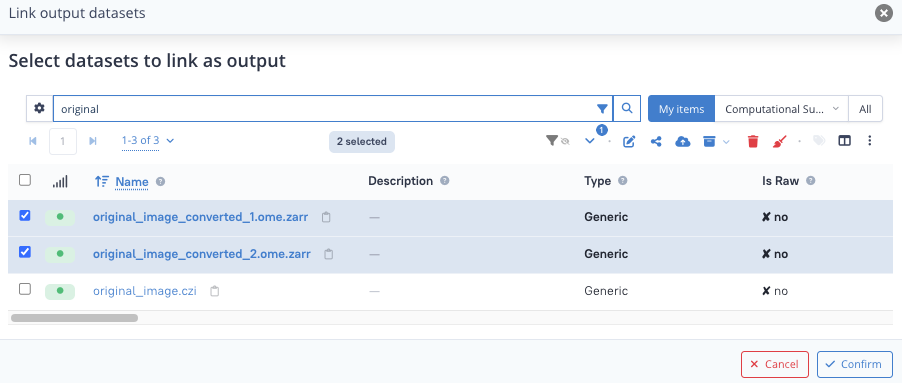
You should now see something like the following.
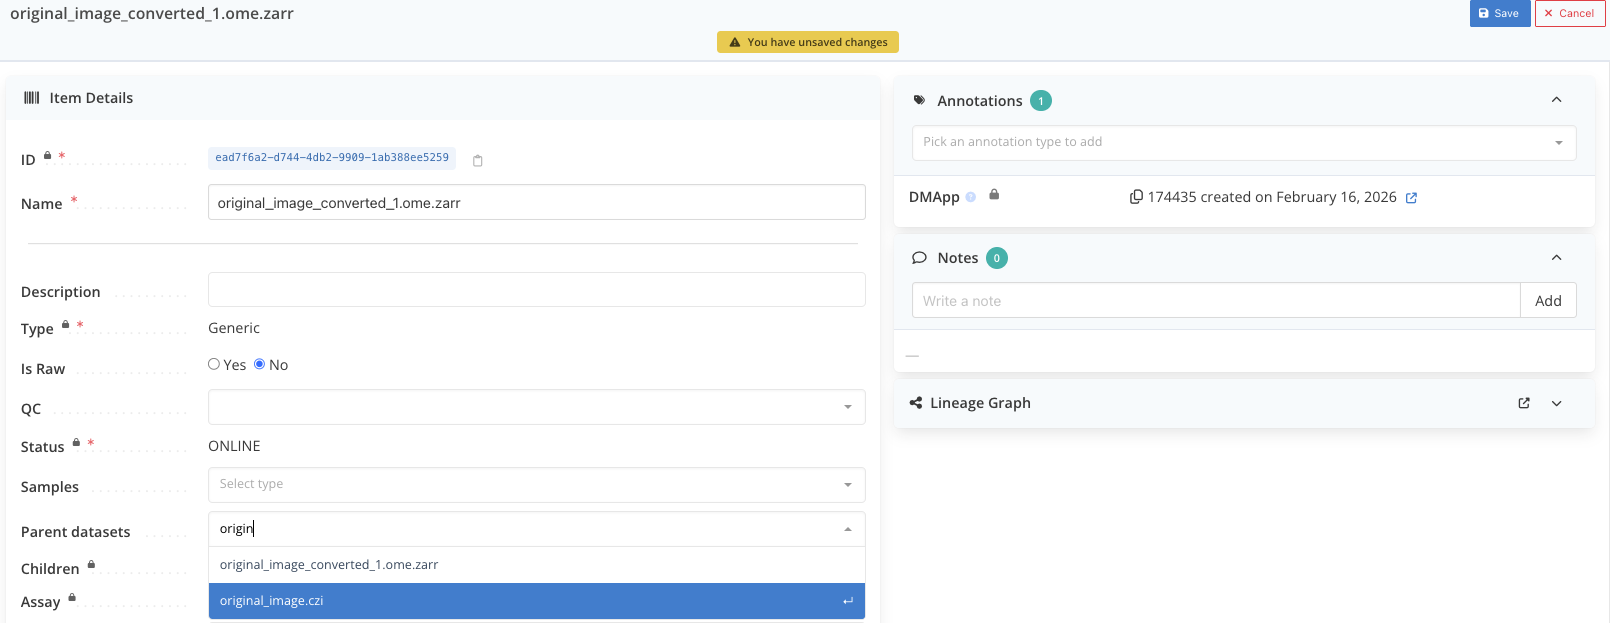
Step 5 : Establish parent/child relation between input and output datasets
In this last step, we are going to associate the ome.zarr datasets to the czi dataset with a "parent/child" relation.
For this particular image-conversion workflow, we know that the ome.zarrs are directly "derived" i.e are child of the input czi file, so we can add this additional information to the system, and thus have the full provenance information (inherited from the parent czi dataset).
We are going to use the Parent datasets attribute of the ome.zarr datasets to provide this information.
- from the Outputs tab of the workflow run, click on the name of one of the ome.zarr dataset to go to the actual dataset page
- then click on Edit at the top right.
- open the dropdown for Parent datasets and select the czi dataset
- click Save at the top-right of the page
- repeat for the other ome.zarr dataset
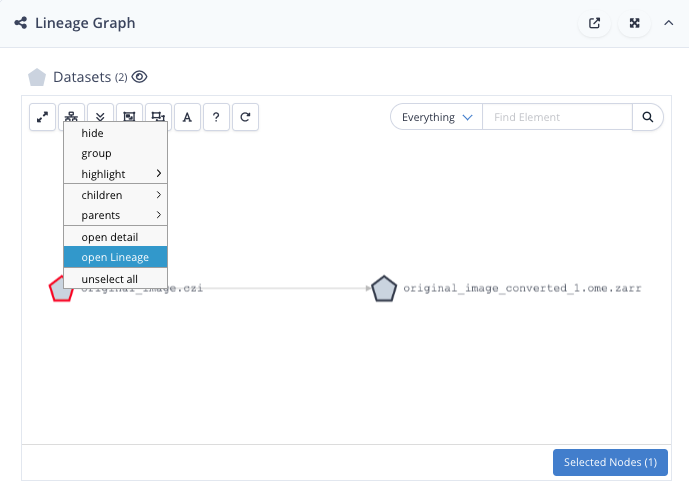
If you refresh the page and extend the lineage graph, you will see that the ome.zarr dataset now has the czi dataset as parent.
You can right-click on the czi dataset in the lineage graph, and select "open Lineage".
You should now see the 2 ome.zarr depicted as childs of the czi image.
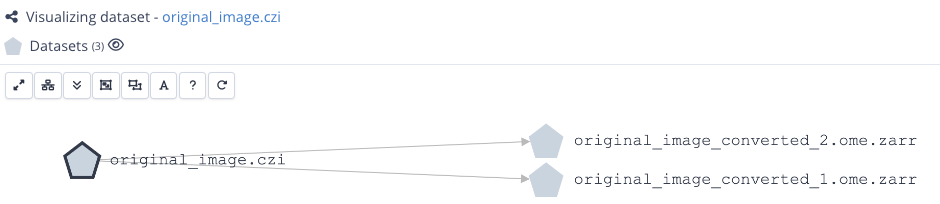
If the czi dataset had been registered properly as a raw dataset, the assay and sample information would also be depicted. Importantly, beyond the visualization, the ome.zarr dataset would inherit now the full provenance information, all the way up to the biological sample that was imaged by the microscope.
Why do I need to establish this parent/child relation ?
While the datasets are already linked through the workflow, there is at this point no direct parent/child relation between datasets. The reason is that depending on the workflow, there is not always a 1-to-1 correspondance between input and output datasets. By establishing this parent/child relation, you ensure that the metadata defined on the parent dataset (assay, sample...) are propagated to the child datasets.
Export the workflow run as a RO-Crate
Now that the Workflow Run is properly registered in LabID, you have the possibility to export this run as a Workflow Run RO-Crate. Back on the workflow run page, simply click RO-Crate at the top right of the page. This standardized format lets you share or publish your workflow run, while conserving most of the metadata that was documented in LabID.
Conclusion
Creating a workflow run "by hand" involves a number of steps, which can be time-consuming, especially if you have a large number of runs to register.
Alternatively, the LabID Command Line Interface (CLI) provides utilities to register such workflow runs in batch (including registration of the data), or to automate the registration. This functionality is covered in a follow-up tutorial.